How to create an alias in ASM

This note explains how to create an alias in ASM. We will look at an example of creating an alias for SPFILE.

oracrs – +ASM1 >sqlplus

SQL*Plus: Release 12.1.0.2.0 Production on Tue Jan 28 09:26:46 2020

Copyright (c) 1982, 2014, Oracle.  All rights reserved.

Enter user-name: sys as sysasm

Enter password:

Connected to:

Oracle Database 12c Enterprise Edition Release 12.1.0.2.0 – 64bit Production

With the Real Application Clusters and Automatic Storage Management options

SQL> alter diskgroup ORCL_DG ADD ALIAS ‘+ORCL_DG/ORCL/PARAMETERFILE/spfileORCL.ora’ for ‘+ORCL_DG/ORCL/PARAMETERFILE/spfile.277.1030872227’;

Diskgroup altered.

SQL> exit

Disconnected from Oracle Database 12c Enterprise Edition Release 12.1.0.2.0 – 64bit Production

With the Real Application Clusters and Automatic Storage Management option

oracrs – +ASM1 >asmcmd

ASMCMD> cd +ORCL_DG/ORCL/PARAMETERFILE/

ASMCMD> ls -ltr

WARNING:option ‘r’ is deprecated for ‘ls’

please use ‘reverse’

Type           Redund  Striped  Time             Sys  Name

PARAMETERFILE  UNPROT  COARSE   JAN 28 09:00:00  Y    spfile.277.1030872227

PARAMETERFILE  UNPROT  COARSE   JAN 28 09:00:00  N    spfileORCL.ora => +ORCL_DG/ORCL/PARAMETERFILE/spfile.277.1030872227

References:

Database spfile Parameter alias is not created in ASM Diskgroup and init<SID>.ora in $ORACLE_HOME/dbs refers to a non existing spfile alias in ASM diskgroup (Doc ID 1950769.1)

ORA-31623: a job is not attached to this session via the specified handle during datapump import

I recently tried importing metadata into a newly created database and received the following error.

Import: Release 12.1.0.2.0 – Production on Mon Jan 27 10:25:39 2020

Copyright (c) 1982, 2014, Oracle and/or its affiliates.  All rights reserved.

Connected to: Oracle Database 12c Enterprise Edition Release 12.1.0.2.0 – 64bit Production

With the Partitioning, Real Application Clusters, Automatic Storage Management, OLAP,

Advanced Analytics and Real Application Testing options

UDI-31623: operation generated ORACLE error 31623

ORA-31623: a job is not attached to this session via the specified handle

ORA-06512: at “SYS.DBMS_DATAPUMP”, line 3905

ORA-06512: at “SYS.DBMS_DATAPUMP”, line 5203

ORA-06512: at line 1

After reading MOS note (Doc ID 1907256.1) I decided to check streams pool size.

SQL> show parameter streams

NAME                                 TYPE        VALUE

———————————— ———– ——————————

streams_pool_size                    big integer 0

SQL> show parameter memory_max_target

NAME                                 TYPE        VALUE

———————————— ———– ——————————

memory_max_target                    big integer 0

SQL> show parameter memory_target

NAME                                 TYPE        VALUE

———————————— ———– ——————————

memory_target                        big integer 0

SQL> show parameter sga_max_size

NAME                                 TYPE        VALUE

———————————— ———– ——————————

sga_max_size                         big integer 4G

SQL> show parameter sga_target

NAME                                 TYPE        VALUE

———————————— ———– —————————–

sga_target                           big integer 4G

A quick check showed there was not enough space to increase the streams_pool_size.

SQL> alter system set streams_pool_size=200M sid=’orcl_1′ scope=memory;

alter system set streams_pool_size=200M sid=’orcl_1′ scope=memory

*

ERROR at line 1:

ORA-02097: parameter cannot be modified because specified value is invalid

ORA-04033: Insufficient memory to grow pool

Since there was plenty of memory on the system, I decided to increase the sga size and streams_pool_size.

SQL> alter system set streams_pool_size=200M sid=’*’ scope=spfile;

SQL> alter system set sga_max_size=5G scope=spfile sid=’*’;

System altered.

SQL> exit

After recycling the instance the issue was resolved.

References:

How to resolve the Data Pump error ORA-31623 UDE-31623 (a job is not attached to this session via the specified handle)? (Doc ID 1907256.1)


Installing Oracle Enterprise Linux (OEL) 6.5 on Oracle Virtual Box VM

When I blogged for the first time in July of 2015, my intention was to blog at least once a month. However, as you can see, that didn’t go very well. But here we are in 2016, and I am hoping I can do a better job this time around. My last blog was about installing Oracle VM on Windows 8.1.

This time, we are going to look at installing Oracle Enterprise Linux 6.5 for x86 64 BIT platform on a virtual machine inside Virtual Box.

Of course, to start with, we have to download the Linux software. This can be done by registering for an account, if you don’t have one, with Oracle’s e-delivery web site at https://edelivery.oracle.com.

Once you have logged in and accepted the terms around export restrictions and license agreement, you will be guided to a page you can search for the software you want to download. You will need to choose the check box right next to Linux/OVM/VMs, and then do a search for Oracle Linux, and chose platform as x86 64 bit, and choose continue by scrolling down.

pic1ora

This will take you the next screen, which as of now, by default, displays OEL 7.x as the choice. But we are installing OEL 6.5 in this case. By choosing Select Alternate Release hyperlink, you will be guided to the page where you can choose the appropriate software, OEL 6.5 for x86 64 BIT in our case.


pic3ora

As you can see above, you are presented with a choice of downloads. In our case, we are going to choose the iso image.

pic4

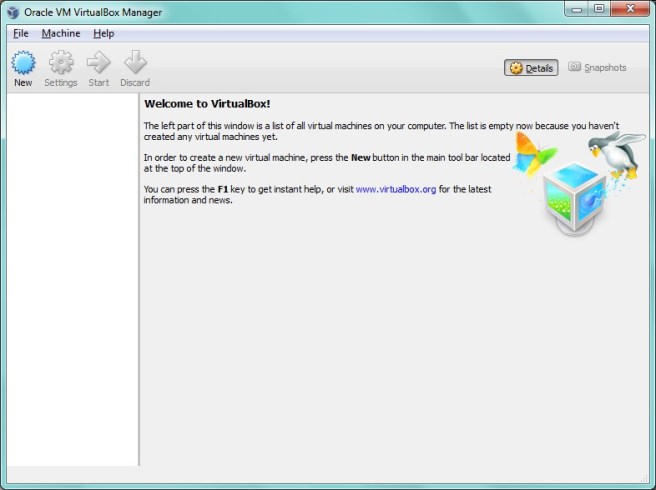
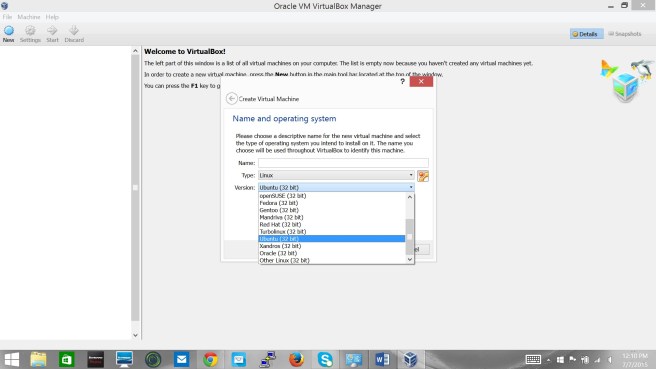
Once you have downloaded the software, we are ready to begin. Start Virtual Box by clicking on the appropriate icon.

pic5

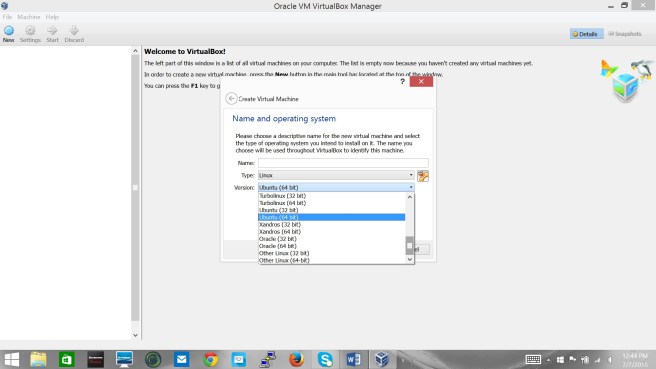
Click on New and fill out the details. Note that you change the name at a later time too.

pic6

Click Next. My laptop has around 8GB of memory and I will be reserving around 4G for the VM. Note that one of my next blogs will be about installing Oracle database 12c on the Linux VM. So we need at least 4G to do so. Again, this setting can be changed after the VM has been created.

pic7

Next we have to choose the type of the new virtual hard drive we would like to create. In my case, I have chosen VMDK, which is same as the format that is supported by VMWare.

pic8

Click Next.

Next, we choose how space should be allocated for the new virtual disk we are about to create. I have chosen the space to be allocated dynamically.

pic9

Click Next.

We now have to name the disk and provide a size for the same. I will be reserving this virtual disk for the OS. In my next blog about installing Oracle, we will see how we can add more virtual disks for Oracle binaries, database files etc. as required.

pic10

Click on Create. This should return you back to the main Virtual Box window.

pic11

Click on Settings -> General -> Advanced. We will change the setting as below which would help us copy files etc. at a later time.

pic12

Click OK to save the changes.

Now we can start the VM by clicking on the Start button. Since this is the first time we are starting the VM you should see a dialogue box asking to provide the location of a startup disk. We will choose the location of the ISO image for OEL 6.5 which we downloaded earlier. Click Start.

pic13

Press enter after choosing Install or Upgrade an existing system.

pic14

pic15

pic16

Skip the media test.

pic19

Click Next

pic20

Choose the languages you want to install.

pic21

Click Next.

Choose the appropriate keyboard based on the languages you chose.

keyboard


Click Next.

Choose as below and click next.

pic22

Choose “Yes, discard any data” and click next. Please note that this will only affect the VM disk you created earlier.

pic23

Next, we will pick a name for our Linux host. Click on “Configure Network” before clicking next.

pic24

Assuming you have only one network card, you will get a similar dialogue box. Choose the device and click Edit.

pic25

pic27

Make sure you check “Connect Automatically”

pic26

Apply, close, click next

Choose the appropriate time zone and click next.

pic28

Next, provide a password for the “root” account. Click Next.

pic29

Since I chose a weak password for root, I received a dialogue box as below. Click Next to continue.

pic30

Next, we choose what the installer should do with the virtual disk we presented. In my case, I have chosen to remove any existing Linux system. Since this a new VM device, I could have chosen some of the other options as well.

pic31

Click Next.

You will now choose Write Changes to disk. Note that it will only affect the device you presented earlier to this VM.

pic32

It is now time to select what software components to install. Remember, our goal is to setup this VM so we can install Oracle on it. So we are going to make selections accordingly as shown in the next few screens.

Choose Basic Server, and make sure you select Customize Now.

pic33

Click Next.

This should bring up the next screen, which should look similar to below screen. Choose “Servers”. Make your selection to match below.

pic34

Note: DO NOT CLICK “Next” on this screen until you have selected all the software components as it will start the installation immediately.

For System administration tools, click on Optional packages and choose as below. Do not worry about it too much. If you miss to install a few of the required packages for Oracle installation or otherwise, we can always install it at a later time after the VM is up and running using YUM installer.

pic34-2

Note: DO NOT CLICK “Next” until you have selected all the software components as it will start the installation immediately.

Next, choose Desktops and make selections as below.

picdesktop

Note: DO NOT CLICK “Next” until you have selected all the software components as it will start the installation immediately.

Next, choose “Applications” and make your selections.

pic37

One you have selected all the required software components, click “Next” to begin installation.

pic38

It will take a while before all the software components are installed.

Click Reboot once the installation is complete.

pic39

You should see several messages as below as the VM reboots.

pic40

Once the VM reboots, we need to continue with the rest of configuration tasks before we can use the system.

pic42

Click Forward.

First, we need to accept the license agreement and click “Forward”.

pic43

Next, you will be presented with the option to register your system with the unbreakable Linux network. I have chosen not to register at this time.

pic44

Click forward to continue with the setup and configuration.

pic45

Click “Forward” to continue.

pic46

We have an option to create and additional user, but we will skip this for now and click “Forward” to continue.

pic47
Choose the  date and time and click “Forward”.

pic48

In the next screen, we have an option to enable kernel dump which could be helpful in analyzing system crash etc. I have chosen not to enable it at this time. Note that you can always enable it at a later time of need be.

pic49

Click “Finish” to complete the system setup.

You should now see the screen below.

pic50

Since we choose some additional packages related to oracle, the system already comes with a predefined “oracle” account. However, we will choose “Other” and login as “root” for now. Later on when we are ready to install Oracle we will change the password for the “oracle” OS account.

Since we logged in as “root” user using the GUI, we will be presented with a message as below. We can ignore this for now and close the dialogue box.

pic51

Our system is ready for use now.

pic52

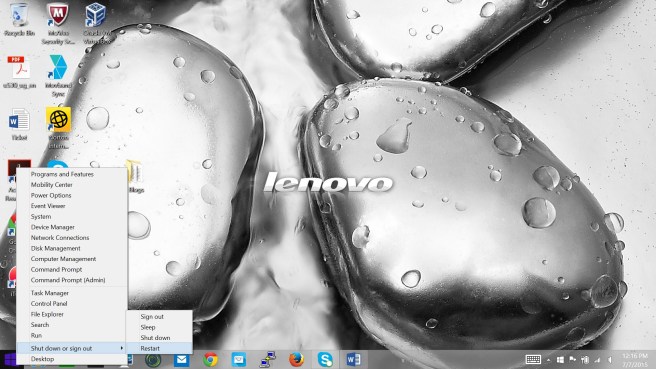
If you wish, you can play around a bit, or cleanly shutdown the machine until we are ready to install Oracle. If you choose to shut down your machine, follow the next few screens to do so.

pic53pic54pic55pic56

There we are. We have successfully installed Oracle Enterprise Linux (OEL) 6.5 64 BIT OS on our newly created VM. In the next blog, we will see how we can install Oracle 12c database on our new VM.


Installing Oracle VM VirtualBox on Windows 8.1

Ever wished you could run Linux or another operating system on your laptop? Well, Oracle’s VirtualBox may be the answer.

In simple terms, VirtualBox is software that allows you to run multiple operating systems such as Linux, Windows, etc. on your laptop or desktop in addition to your existing operating system, all at the same time.

VritualBox is different from other popular hypervisors such as VMWare that can be directly installed on x86 based computers. VirtualBox requires a host operating system such as Windows or Linux already installed on the computer for it to run.

However, VirtualBox allows great flexibility by allowing you to install multiple operating systems on top of your existing OS and running them all at the same time, sharing resources such as memory, CPU, and, hard disk.

This can come in very handy, say for example, for an Oracle DBAs, to install and configure  Oracle database 12c on a Oralcle Enterprise Linux (OEL) 6.x or 7.x, on their laptop or desktop, without having to wipe out the existing operating system. In addition, Oracle Corporation, for example, provides pre-built VirtualBox images for many purposes such as developer VM images, Linux VM image, etc.

In this example, I will walk you through the steps to install VirtualBox on a laptop running Windows 8.1 64-BIT OS. The laptop we will be installing VirtualBox on has 8GB memory and Intel i7 processor. If you are installing VirtualBox so you can play around with Oracle 12c or Oracle 11g database running on OEL, you will need a laptop or desktop with at least 8GB memory for it to be relatively useful.

To begin with, we have to download the appropriate build of VirtualBox based on your existing OS. The software can be downloaded from the following url.

https://virtualbox.org/wiki/Downloads

Since I am running 64BIT Windows 8.1 OS, I downloaded the file named VirtualBox-4.3.28-100309-Win.exe by choosing “VirtualBox 4.3.28 for Windows hosts”. At this time, the current version of VirtualBox is 4.3.28. Please ensure you are downloading the latest version available as there are more features and bug fixes added with newer versions. In addition, it is advisable to install the virtual box extension pack as well. You can download the same from the same link as above. You will need to ensure you are downloading the appropriate version that matches your existing OS release.

Now that I have downloaded the file, I can run it by double clicking on the executable file.

Based on your host operating system configuration, you may receive a warning message asking to confirm you want to run the executable. Once confirmed, the installation should begin shortly.

When the installation window appears, click “Next >” to continue.

Pic1


If you would like to install VirtualBox on the default location, click next. If not, change the installation directory at this point.

Click “Next >”.

PIC2


Make changes as necessary and click “Next >”.

pic3


Note: If your computer is connected to a network, please pay attention as this would disrupt your network connection temporarily.

Click “Yes” to continue the Installation.

picnet

Click “Install” to begin the installation.

pic5


After a brief pause, the installation should start by displaying a progress window as shown below.

pic6

During the installation, you may receive a popup window as below. If so, make sure you check mark “Always trust software from Oracle Corporation” check box to avoid multiple such popup windows during installation.

Click on “Install” to proceed.

.pic8

Once the installation is complete, the final popup window will be displayed. By default, the installer will automatically start VirtualBox. You may change this behavior by un-checking the option below.

Click “Finish” to conclude the installation.

pic9

If you accepted the default setting, at this point, the VirtualBox application will automatically start, and a window as below should display.

pic10

If you previously downloaded the VirtualBox Extension Pack, double click the file name (Oracle_VM_VirtualBox_Extension_Pack-4.3.28-100309.vbox-extpack in my case) to begin installation. This should bring up a window as below.

Click “Install” to continue.

pic11


Scroll down to the bottom of the terms & conditions to activate the “I Agree” button.

pic12

Click on “I Agree” to begin installation.


At the end of the installation you should see a screen similar to the one below. Click on “OK” to complete the installation.

pic13

Bring up the “Create Virtual Machine” dialog box by clicking “New” at the top left corner of VirtualBox manager. You may notice that even though I installed VirtualBox on 64 BIT OS, VirtualBox is showing only 32 BIT OS as options (see screenshot below).

pic14


In order to fix this, I will need to change the BIOS setting on my laptop. If you are using Windows 8.1, typically, you will need to “restart” your computer instead of shuttig down in order to access your computers setup menu using F1 during startup. Rigth click on start to get to restart.

Restart your computer.

pic15


When your computer restarts, press Fn key + F2 to enter setup. Under “Configuration”, choose “Intel Virtual Technology” and enable it. Save and exit setup. Once the restart is complete we should be able to see the 64 BIT options in VirtualBox.

Please note that the setup utility and screens may be different depending on the make and model of your laptop/desktop.

pic16


Now let us confirm the options for new VMs in VirtualBox includes 64 BIT OS.

pic18


That’s it. We now have VirtualBox installed and ready to go. In my next blog, I will be providing an example of installing 64 BIT Linux OS image using VirtualBox.